Ruby 搭配 Sketchup 學習筆記(二)
前情提要
Sketchup 是一款在建築、都市計畫和遊戲開發都頗有名氣的 3D 建模軟體,而 Ruby 則是一個程式語言,它可以搭配 Sketchup 達成程式化 建模的任務,近期經由系主任引薦,要開發 Sketchup 的 Extension,雖然我寫過 Ruby,但 Sketchup 則是完全沒碰過,於是利用文章來記錄所學的一點一滴。
本篇內容
- Ruby code editor 預設內容
- 使用 Ruby console load .rb 檔案
- 畫五邊形
- 多邊形
- 弧線
- Sketchup 軸線意義
Ruby code editor 預設內容
還記得上一篇我們最後畫了一條直線,這個程式碼如下:
Sketchup.active_model.entities.add_line [0,0,0],[9,9,9]
但其實 Ruby code editor 有預設的程式碼可以幫我們縮短以上的內容。
在開啟 Ruby code editor 時,你的畫面應該會像這樣:
點擊上方工具列的 Edit/Edit Default Code 後你可以看到此畫面
不用更改任何內容,當我們再次開啟 Ruby code editor 時,就會有此預設的內容。
下一步我們把原本畫直線的程式碼更改為以下:
ent.add_line [0,0,0],[9,9,9]
放在預設程式碼的下方,執行後結果將會與原本的程式碼相同。
使用 Ruby console load .rb 檔案
使用 Ruby code editor 寫 Ruby 優點是隨開隨寫,但我還是習慣使用外部的編輯器打扣,畢竟快捷鍵還是熟悉的用起來比較順暢,那該如何在 Sketchup 中載入已寫好的 Ruby 檔案呢,接著看下去:
我使用的是 Mac OSX 系統,而 Sketchup 的 Ruby Console 讀取的目錄會是以下路徑
~/Library/Application Support/SketchUp ${版本號}/SketchUp/Plugins
得知路徑後,在該目錄下新增一個 test.rb 後,再到 Ruby Console 執行以下內容就可以載入該檔案
load 'test.rb'
這邊也可以建個資料夾管理檔案,而詳細如何管理那就依個人喜好決定了。
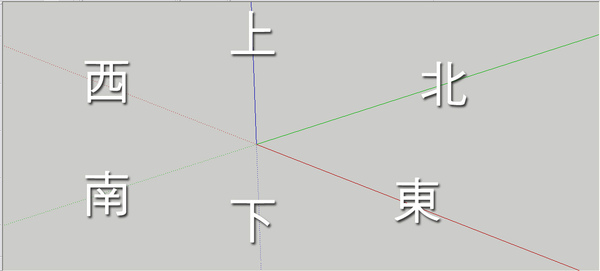
Sketchup 軸線意義
在 Sketchup 上可以看到三種顏色的線,分別是紅、綠和藍,這三條線在傳統的建模軟體代表意義應該是:
- 紅:X軸,[1,0,0]
- 綠:Y軸,[0,1,0]
- 藍:Z軸,[0,0,1]
但實際上 Sketchup 並不是用 XYZ 進行區分,而是用東南西北、上下來區分,如下圖:

不過這只是習慣問題,所以其實沒什麼差。
畫五邊形
在 Sketchup 中假如要畫一個五邊形,會使用線段來完成,而線段被視為邊緣物件(Edges),有幾種做法,以下逐一介紹。
直線
用直線畫五邊形應該是最容易想到的,程式碼如下:
# Default code, use or delete...
mod = Sketchup.active_model # Open model
ent = mod.entities # All entities in model
sel = mod.selection # Current selection

pt1 = [5, 0, 0]
pt2 = [1.5625, -4.75, 0]
pt3 = [-4.0625, -2.9375, 0]
pt4 = [-4.0625, 2.9375, 0]
pt5 = [1.5625, 4.758, 0]

ent.add_line pt1, pt2
ent.add_line pt2, pt3
ent.add_line pt3, pt4
ent.add_line pt4, pt5
ent.add_line pt5, pt1
曲線
曲線其實就是直線的進階版,它可以接受多個點傳入,除了畫出五邊形之外,順便觀察它的 class 與 length,程式碼如下:
# Default code, use or delete...
mod = Sketchup.active_model # Open model
ent = mod.entities # All entities in model
sel = mod.selection # Current selection

pt1 = [5, 0, 0]
pt2 = [1.5625, -4.75, 0]
pt3 = [-4.0625, -2.9375, 0]
pt4 = [-4.0625, 2.9375, 0]
pt5 = [1.5625, 4.758, 0]

curve = ent.add_curve pt1, pt2, pt3, pt4, pt5, pt1

puts "curve是什麼?", curve.class #Array
puts "curve的長度?", curve.length #5
圓形
上述的直線以及曲線都不一定要圍成一個封閉的物件,因此假如要製作五邊形這種封閉的物件,圓形會更適合,程式碼如下:
# Default code, use or delete...
mod = Sketchup.active_model # Open model
ent = mod.entities # All entities in model
sel = mod.selection # Current selection

circle = ent.add_circle [0,0,0], [0,0,1], 10, 5
puts circle.class #Array
puts circle.length #5
這邊可以看到傳入 4 個引數,而 add_circle 的參數定義如下:
add_circle center, normal, radius, num_segments = 24
分別代表:
- center:中心點
- normal:方向
- radius:半徑
- num_segments:線段數量。預設為 24。
多邊形
多邊形與圓形幾乎相同,差別在於多邊形的 num_segments 這個參數是沒有預設值,因此不可省略,與圓形比較的程式碼如下:
# Default code, use or delete...
mod = Sketchup.active_model # Open model
ent = mod.entities # All entities in model
sel = mod.selection # Current selection

normal = [0,0,1]
radius = 2

ent.add_ngon [0,0,0], normal, radius, 6
ent.add_circle [5,0,0], normal, radius, 6

ent.add_ngon [10,0,0], normal, radius, 24
ent.add_circle [15,0,0], normal, radius
弧線
弧線十分的麻煩,它的參數定義如下:
add_arc center, xaxis, normal, radius, start_angle, end_angle, num_segments
分別代表:
- center:中心點
- xaxis:從哪個軸線起算
- normal:方向
- radius:半徑
- start_angle:從哪個角度開始畫
- end_angle:在哪個角度結束
- num_segments:線段數量
我們執行以下此段程式碼,並且看看結果:
# Default code, use or delete...
mod = Sketchup.active_model # Open model
ent = mod.entities # All entities in model
sel = mod.selection # Current selection

arc1 = ent.add_arc [0,0,0], [0,1,0], [0,0,1], 5, 0, 90.degrees
arc2 = ent.add_arc [0,0,0], [0,1,0], [0,0,-1], 10, 0, 90.degrees
arc3 = ent.add_arc [0,0,0], [0,1,0], [0,0,1], 15, 0, 180.degrees
arc4 = ent.add_arc [0,0,0], [1,1,0], [0,0,-1], 15, 0, 90.degrees
arc4 = ent.add_arc [0,0,0], [0,0,1], [1,0,0], 15, 0, 90.degrees
執行結果:
看起來十分的混亂,讓我為它標一下名稱
這究竟是怎麼得知的呢!?可以參考「右手定則」,normal 這個參數將決定你大拇指的方向,而四指則是你會弧線繪製的方向,由此一來就可以知道弧線的畫法了最好是。